Using the built-in microphone on the T-WATCH V3
(EN google-translate)
(PL google-translate)
|
Possible uses of the microphone
|
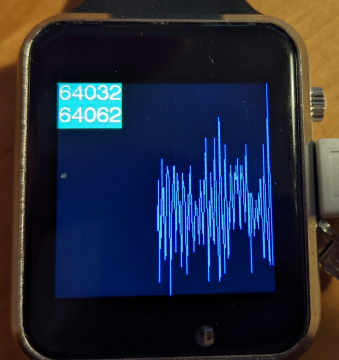
Bild 0-1: Representation of silence or background noise: The waveform is chaotic and the difference between the minimum (64032) and maximum (64062) is very small.

Bild 0-2: Representation of a whistling tone (almost a sine wave). The difference between the minimum (63696) and maximum (64403) is significantly greater. In principle, the fundamental frequency of the tone could be determined.
 https://youtu.be/SSmS02b09fU -- Video on how to use the microphone on the T-WATCH V3 (noise/whistling)
Determining the frequency of the whistling sound
|
Initialization of the microphone in the setup function
|
I2S_CHANNEL_MONO, I2S_BITS_PER_SAMPLE_16BIT, ... are predefined constants.
Using the microphone in the loop function
|
 TWATCH_PROC023_Microphone.zip -- Test example (project for the Arduino IDE)
#include "twatch.h"
#include "variables.h"
#include "functions.h"
//for microphone:
#include <driver/i2s.h>
#define BUFFER_SIZE (2*128)
// TWATCH 2020 V3 PDM microphone pin
#define MIC_DATA            2
#define MIC_CLOCK           0
uint8_t buffer[BUFFER_SIZE] = {0};

int x=0;

int micvalue=0;
int micvalue_old=0;
int minimum=0;
int maximum=0;
void setup()
{
    setupTWATCH();
    //begin setup microphone
    i2s_config_t i2s_config = {
        .mode = (i2s_mode_t)(I2S_MODE_MASTER | I2S_MODE_RX | I2S_MODE_PDM),
        .sample_rate =  44100,
        .bits_per_sample = I2S_BITS_PER_SAMPLE_16BIT,
        .channel_format = I2S_CHANNEL_FMT_RIGHT_LEFT,
        .communication_format = (i2s_comm_format_t)(I2S_COMM_FORMAT_I2S | I2S_COMM_FORMAT_I2S_MSB),
        .intr_alloc_flags = ESP_INTR_FLAG_LEVEL1,
        .dma_buf_count = 2,
        .dma_buf_len = 128,
    };

    i2s_pin_config_t i2s_cfg;
    i2s_cfg.bck_io_num   = I2S_PIN_NO_CHANGE;
    i2s_cfg.ws_io_num    = MIC_CLOCK;
    i2s_cfg.data_out_num = I2S_PIN_NO_CHANGE;
    i2s_cfg.data_in_num  = MIC_DATA;

    i2s_driver_install(I2S_NUM_0, &i2s_config, 0, NULL);
    i2s_set_pin(I2S_NUM_0, &i2s_cfg);
    i2s_set_clk(I2S_NUM_0, 44100, I2S_BITS_PER_SAMPLE_16BIT, I2S_CHANNEL_MONO);
    //end setup microphone
    setFont(1,255,255,255, 0,255,0);
    stroke(0,0,255);
    backlight(true);
}

void loop()
{
    size_t read_len = 0;
    i2s_read(I2S_NUM_0, (char *) buffer, BUFFER_SIZE, &read_len, portMAX_DELAY);
    minimum = buffer[0*2]+buffer[0*2+1]*256;
    maximum = minimum;
    for (int i = 0; i < BUFFER_SIZE/2 ; i++)
    {
        micvalue = buffer[i*2]+buffer[i*2+1]*256;
        if(micvalue>maximum) maximum = micvalue;
        if(micvalue<minimum) minimum = micvalue;
    }
    clear();
    for (int i = 0; i < BUFFER_SIZE/2 ; i++)
    {
        micvalue = buffer[i*2]+buffer[i*2+1]*256;
        micvalue-=minimum;
        micvalue*=height;
        micvalue/=(maximum-minimum);
        line(i+110,micvalue_old,i+111,micvalue);

        micvalue_old = micvalue;
    }
    //micvalue = buffer[0*2]+buffer[0*2+1]*256;
    cursor(0,0);
    editor(minimum);
    editor("\n");
    editor(maximum);

    delay(100);
}
Code 0-1: Example source code -- setup and loop functions in the main tab.
Tab twatch.h
void setupTWATCH()
{
    //Serial.begin(115200);  //weglassen, sonst ev. im Normalbetrieb Probleme

    watch = TTGOClass::getWatch();
    watch->begin();
    // Turn on the backlight .. aber nicht nur das!!!!
    watch->openBL();

    tft = watch->tft;
    sensor = watch->bma;
    hintergrundlicht = watch->bl; //Hintergrundlicht als Objekt verfügbar machen!

    // Accel parameter structure (siehe Kommentare in Originalbeispiel!)
    Acfg cfg;
    cfg.odr = BMA4_OUTPUT_DATA_RATE_100HZ;
    cfg.range = BMA4_ACCEL_RANGE_2G;
    cfg.bandwidth = BMA4_ACCEL_NORMAL_AVG4;
    cfg.perf_mode = BMA4_CONTINUOUS_MODE;

    // Configure the BMA423 accelerometer
    sensor->accelConfig(cfg);

    // Enable BMA423 accelerometer
    sensor->enableAccel();

    // You can also turn it off
    // sensor->disableAccel();

    // Some display settings
    //tft->setTextColor(random(0xFFFF));
    tft->setTextColor(TFT_GREEN, TFT_BLACK);
    //tft->drawString("BMA423 accel",  25, 50, 4);
    tft->setTextFont(4);
    //tft->setTextColor(TFT_WHITE, TFT_BLACK);

    //Check if the RTC clock matches, if not, use compile time
    watch->rtc->check();

    //Synchronize time to system time
    watch->rtc->syncToSystem();
    // Get the current data

    tnow = watch->rtc->getDateTime();

    //wav Tongenerator
/*
    watch->enableAudio();
    watch->enableLDO3();
    file_wav = new AudioFileSourceFunction(1.);
    file_wav->addAudioGenerators(sine_wave);
    #if defined(STANDARD_BACKPLANE)
        output_wav = new AudioOutputI2S(0, 1);
    #elif defined(EXTERNAL_DAC_BACKPLANE)
        output_wav = new AudioOutputI2S();
    //External DAC decoding
        output_wav->SetPinout(TWATCH_DAC_IIS_BCK, TWATCH_DAC_IIS_WS, TWATCH_DAC_IIS_DOUT);
    #endif
    wav_generator = new AudioGeneratorWAV();
    wav_generator->begin(file_wav, output_wav);
*/
}
Code 0-2: General setup function for the T-WATCH, tab twatch.h in project TWATCH_PROC023. The section for initializing sound generation had to be commented out!