Simplified Commands
(EN google-translate)
(PL google-translate)
The following section lists and describes the commands available at the simplified user programming layer level.
The description is organized according to the internal peripherals that can be controlled using commands, i.e., according to which of the following components can be manipulated using the specified commands:
|
In addition, there are predefined additional helper objects and variables designed to simplify clock programming:
EDITOR

The editor(...) method can be used to append characters, numbers, and text to the display area
of the touchscreen.
Line breaks can be implemented with editor("\n");.

The curser(line,column) method can be used to set the position from which
characters are inserted into the editor.

editor(...) works slightly more efficiently than the text(...) function.
A monospace font is used.
The number of lines and characters per line depends on the font size set with
setFont(...).

ACCELERATION VALUES

When the acceleration() function is called, the sensor values of the three-axis
acceleration sensor are read out and stored in the following variables:

int  accX;
int  accY;
int  accZ;
int  absaccX; //Absolute values of the same sensor values...
int  absaccY;
int  absaccZ;

TOUCHPOSITION

When the touch() function is called, the current position of the touch
on the touchscreen is stored in the following variables:

int  mouseX=0;
int  mouseY=0;

TIME

When the updateTime() function is called, the current radio time is
retrieved and its components can be accessed using the following functions:

int getHour12() //12-hour value for the current hour
int getHour()   //24-hour value for the current hour
int getMinute()
int getSecond()

SERIAL MONITOR

During the development phase, it makes sense to read variables at the clock's runtime.
The variables can be transferred to the serial monitor of the Arduino IDE
via an interface emulated via the USB connection to the PC.

setupSERIAL(115200); //activates the serial connection to the PC with a baud rate of 115200.
"Serial" is the object that then provides commands for data transmission.
Examples:
if(Serial) Serial.println("WiFi connected");
if(Serial) Serial.print("ip:");
if(Serial) Serial.println(WiFi.localIP());
if(Serial) Serial.println();
Code 0-1: Additional auxiliary objects and variables.
To make it easier to understand how exactly the commands can be used, a small program snippet has been placed at the beginning of each section, which shows a simple example of how the relevant peripheral can be used.
Procedure:
|
Display
|
#include "twatch.h"
#include "variables.h"
#include "functions.h"

void setup()
{
    setupTWATCH();
    setFont(1, 255,255,255,  255,0,0);
    backlight(true);
}

void loop()
{
    text("Hello World!",width/4,height/4);
    delay(100);
}
Code 0-2: Sample code.
| Command | Example | Description | Hints |
|---|---|---|---|
| setFont(FONT_NUMBER, RED,GREEN,BLUE, RED_B,GREEN_B,BLUE_B); | setFont(1, 255,255,255, 255,0,0); | Set used font. | Size, Text Color, Background Color, RGB: 0..255 |
| text("String",POS_X,POS_Y); | text("Hello World!",width/4,height/4); | Shows text | text, position |
| backlight(BOOL) | backlight(true); | Turn background light on or off | bool value: true or false |
| stroke(RED,GREEN,BLUE) | stroke(0,0,255); | sets pen color | drawing command |
| fill(RED,GREEN,BLUE) | fill(0,0,255); | sets fill color | drawing command |
| noStroke() | noStroke(); | no outline | drawing command |
| noFill() | noFill(); | no fill color | drawing command |
| rect(x,y,width,height) | rect(30,40,70,20); | draws a rectangle | drawing command x,y left upper corner |
| circle(x,y,radius) | circle(50,50,20); | draws a circle | drawing command x,y center coordinate |
| line(x1,y1,x2,y2) | line(10,20,120,100); | draws a line | drawing command x1,y1 starting point, x2,y2 end point |
| triangle(x1,y1,x2,y2,x3,x4) | triangle(10,10,40,10,25,25); | draws a triangle | drawing command |
Tabelle 0-1: Befehle zur Manipulation des Displays.
Exercise
|
Touch
#include "twatch.h"
#include "variables.h"
#include "functions.h"

void setup()
{
    setupTWATCH();
    backlight(true);
}

void loop()
{
    if(touch()) // updates mouseX and mouseY
    {
       //red background if screen touched
       background(255,0,0);
    }
    else
    {
       //else green
       background(0,255,0);
    }
    fill(0,0,255);
    //shows a circle at last touch-position, which always is saved in mouseX and mouseY.
    circle(mouseX,mouseY,20);
    delay(100);
}
Code 0-3: Sample code.
| Command | Example | Description | Hints |
|---|---|---|---|
| touch() : bool | if(touch()){MODE++;} | React on touch. | function returns true if screen touched, else false. updates mouseX and mouseY. |
Tabelle 0-2: Commands for using the touch sensor.
IMU (Inertia Measurement Unit)
#include "twatch.h"
#include "variables.h"
#include "functions.h"

void setup()
{
    setupTWATCH();
    setFont(1, 255,255,255,  255,0,0);
    backlight(true);
}

void loop()
{
    bool res = acceleration();

    cursor(0,0);

    if(accX>=0) editor('+'); else editor('-');
    if(absaccX<1000) editor('0');
    if(absaccX<100) editor('0');
    if(absaccX<10) editor('0');
    editor(absaccX);
    editor('\n');

    if(accY>=0) editor('+'); else editor('-');
    if(absaccY<1000) editor('0');
    if(absaccY<100) editor('0');
    if(absaccY<10) editor('0');
    editor(absaccY);
    editor('\n');

    if(accZ>=0) editor('+'); else editor('-');
    if(absaccZ<1000) editor('0');
    if(absaccZ<100) editor('0');
    if(absaccZ<10) editor('0');
    editor(absaccZ);
    editor('\n');

    delay(100);
}
Code 0-4: Sample code.
| Command | Example | Description | Hints |
|---|---|---|---|
| acceleration() | acceleration(); | Updates variables accX, accY, accZ, accabsX, accabsY, accabsZ. | sensor values from IMU are saved in predefined variables. |
Tabelle 0-3: Commands for using the IMU (Inertia Measurement Unit).
RTC (Real Time Clock)
#include "twatch.h"
#include "variables.h"
#include "functions.h"

void setup()
{
    setupTWATCH();
    setFont(1, 255,255,255,  255,0,0);
    updateTime(); //RTC Zeit holen
    backlight(true);
}

void loop()
{
    if(button())
       updateTime(); //RTC Zeit holen

    cursor(0,0);
    if(getHour()<10) editor('0');
    editor(getHour());
    editor('\n');
    if(getMinute()<10) editor('0');
    editor(getMinute());
    editor('\n');
    if(getSecond()<10) editor('0');
    editor(getSecond());
    editor('\n');

    delay(100);
}
Code 0-5: Sample code.
| Command | Example | Description | Hints |
|---|---|---|---|
| updateTime() | updateTime(); | gets realtime. | sets the watch to actual time zone. |
| getHour() : int | int h = getHour(); | gets hours. | gets hours of actual time. |
| getMinute() : int | int m = getMinute(); | gets minutes. | gets minutes of actual time. |
| getSecond() : int | int m = getSecond(); | gets seconds. | gets seconds of actual time. |
Tabelle 0-4: Commands for using the real-time clock.
WiFi
|
|
To be adjusted in the smartwatch program: Name and password of the hotspot!
To be adjusted in the PC program: Broadcast IP address of the hotspot network!
The hotspot can conveniently be provided by the device (PC, laptop, Android device) on which the receiver program is running.
 Further information on UDP and Internet programming: 67_Echtzeitsysteme/09_Internetprogrammierung/04_Java
Further information on setting up a hotspot on your PC: 08_Archiv/06_Ing/01_Bauplan/04_Hotspot
Further information on setting up a hotspot on Android: 05_esp32AV/01_Bauanleitung/01_Elektronik_und_Software/03_Videostream
Further information on UDP and Internet programming: 67_Echtzeitsysteme/09_Internetprogrammierung/04_Java
Further information on setting up a hotspot on your PC: 08_Archiv/06_Ing/01_Bauplan/04_Hotspot
Further information on setting up a hotspot on Android: 05_esp32AV/01_Bauanleitung/01_Elektronik_und_Software/03_Videostream
 TWATCH_PROC005_hotspot.zip -- PC/laptop-based reception program as a Processing sketch.
TWATCH_PROC005_hotspot_ANDROID.zip -- Receiver program as a Processing sketch for an Android device (slightly modified compared to the PC version).
TWATCH_PROC023_WiFiminimal.zip -- Smartwatch project for testing WiFi compatible with the above two programs.
TWATCH_PROC005_hotspot.zip -- PC/laptop-based reception program as a Processing sketch.
TWATCH_PROC005_hotspot_ANDROID.zip -- Receiver program as a Processing sketch for an Android device (slightly modified compared to the PC version).
TWATCH_PROC023_WiFiminimal.zip -- Smartwatch project for testing WiFi compatible with the above two programs.
TWATCH_PROC005_hotspot -- Complete PC/laptop-based reception program. ATTENTION: Broadcast IP must be adjusted.
import hypermedia.net.*;
String IP = "10.42.0.255"; //ANPASSEN! Broadcast IP des Hotspotnetzes
int PORT = 6000; //für UDP benötigt.
UDP udp;
String NACHRICHT="";

public void setup()
{
    size(700,500);
    udp = new UDP( this, 6000 );
    udp.listen( true );
    frameRate(10);
}

public void draw()
{
    background(255);
    fill(0);
    textSize(20);
    text("Empfangen:",30,30);
    text(NACHRICHT,30,60);
    udp.send("Test", IP, PORT ); //Dummy Nachricht an Smartwatch, um Antwort auszulösen.
}

//Callbackroutine für das Empfangen der IMU-Werte:
void receive( byte[] data, String ip, int port )
{
      String x = new String( data );
      if(x!=null && !x.equals("Test"))
         NACHRICHT = x;
}
Code 0-6: Complete PC/laptop-based reception program. ATTENTION: Broadcast IP must be adjusted.
TWATCH_PROC005_hotspot_ANDROID -- Complete reception program, Android version
import hypermedia.net.*;
String IP = "192.168.96.255";
int PORT = 6000; //für UDP benötigt.
UDP udp;
String NACHRICHT="";

public void setup()
{
    fullScreen();
    udp = new UDP( this, 6000 );
    udp.listen( true );
    frameRate(10);
    orientation(LANDSCAPE);
}

public void draw()
{
    background(255);
    fill(0);
    textSize(130);
    text("Empfangen:",130,130);
    text(NACHRICHT,130,260);

    udp.send("Test", IP, PORT );
}

void receive( byte[] data, String ip, int port )
{
   String x = new String( data );
   if(x!=null && !x.equals("Test"))
      NACHRICHT = x;
}
Code 0-7: Complete reception program, Android version.
Main tab from the Arduino project TWATCH_PROC023_WiFiminimal, the minimal version of WiFi for the T-WATCH
#include "twatch.h"
#include "variables.h"
#include "functions.h"

const char* hotspot = "hotspotK";
const char* password = "12345678";
int udpport = 6000;

void setup()
{
    setupTWATCH();
    setupWIFI(hotspot,password,udpport);
    setFont(1, 255,255,255,  255,0,0);
    backlight(true);
}

void loop()
{
    //WiFi-Verbindung herstellen, wenn Knopf gedrückt und falls nicht vorhanden:
    if(button() && !WIFIOKAY)
    {
        setupWIFI(hotspot,password,udpport);
    }

    //Beschleunigungswerte aktualisieren:
    acceleration();

    //Wenn WiFi-Verbindung vorhanden und
    //auf Pakete warten aktiviert...
    if(WIFIOKAY && udp.listen(UDPPORT))
    {
        //...dann Beschleunigungswerte an PC schicken, wenn dieser
        //etwas gesendet hat:
        udp.onPacket([](AsyncUDPPacket packet)
        {
                packet.printf("accX=%d accY=%d accZ=%d", accX,accY,accZ);
        });
    }

    cursor(0,0);

    //Beschleunigungswerte auf einfache Art und Weise anzeigen:
    editor(accX);
    editor('
');
    editor(accY);
    editor('
');
    editor(accZ);
    editor('
');

    //Falls WiFi Verbindung vorhanden, eigene IP in dem
    //Hotspot-Netz anzeigen:
    if(!WIFIOKAY)
    {
            editor("no WiFi!");
            //editor((unsigned long)millis());
    }
    else
    {
            tft->print(WiFi.localIP()); //...Originalmethode
            //editor(WiFi.localIP()); ...klappt nicht
    }
    editor('
');

    delay(100);
}
Code 0-8: Main tab from the Arduino project TWATCH_PROC023_WiFiminimal, the minimal version of WiFi for the T-WATCH
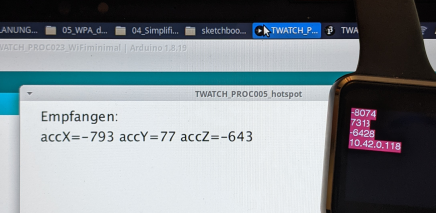
Bild 0-1: Testing the project TWATCH_PROC023_WiFiminimal.
Bluetooth
Button
#include "twatch.h"
#include "variables.h"
#include "functions.h"

void setup()
{
    setupTWATCH();
    backlight(true);
}

void loop()
{
    if(button())
    {
       //red background if button pressed
       background(255,0,0);
    }
    else
    {
       //else green
       background(0,255,0);
    }
    delay(100);
}
Code 0-9: Sample code.
| Command | Example | Description | Hints |
|---|---|---|---|
| button() : bool | if(button()){MODE++;} | React on button. | function returns true if button pressed, else false. |
Tabelle 0-5: Commands for using the physical button.
Vibration
#include "twatch.h"
#include "variables.h"
#include "functions.h"

void setup()
{
    setupTWATCH();
    setupMotor();
    backlight(true);
}

void loop()
{
    if(button())
    {
       //Motor running if button pressed.
       motor();
    }
    delay(100);
}
Code 0-10: Sample code.
| Command | Example | Description | Hints |
|---|---|---|---|
| setupMotor() | setupMotor(); | Make vibration possible. | function initializes motor, used in setup() |
| motor() | motor(); | Runs motor for a short while. | used in loop() |
Tabelle 0-6: Commands for using the motor.